
 |
 |
 |
 |
 |
 |
|
|
|||||
|
Spline Modeling Heads |
|
||||||
| By Michael B. Comet - This article, all images and character designs are Copyright 1998 Michael B. Comet All Rights Reserved. | |||||||
Heads and Splines and Software . . . Oh my!With the advent of more powerful 3D software, the ability to create organic shapes has improved much over the last few years. Artists are no longer restricted to simple geometric objects, and are free to easily create flowing, more natural items. Of these, the human head is one that is often chosen because of it's distinctiveness, and uses in animation.This article gives an overview of the process of creating a head out of splines. Specifically, I will discuss using 3D Studio MAX 1.2 and the Surface Tools plugin by Peter Watje. The surface tools plugin should be available for purchase by Digimation, and is a relatively cheap plugin. Note that there are other techniques for spline modeling, especially when using NURBS or other spline types. However, the process here should still yield some insight into the techniques I use, and be applicable to basic patch and spline modeling in a variety of other packages. IMPORTANT: MAX 3.0 and later now has the surface tools suite built in. However, version 2.5 and later no longer allow you to weld the spline points! This is simply how splines now work in MAX. I am not sure why they changed it. So in cases below where it says to weld points, you will have to be happy simply 3d snapping them to the same location and leaving them separate. The surface modifier should still work. As a note, I'd now highly recommend using box modeling/meshsmooth modeling, instead of surface tools, even for modeling the face. In fact, the anime head, while it started as a surface tools model, was eventually converted to a low poly meshsmooth model the same as the body and finished up that way...which is why the final image here looks different than the ones in the images elsewhere on my page. In fact I now have a Head Poly modeling tutorial on my site now as well that you can use instead!!!! Finally, if you want to know more about how I did the hair, read the bottom of the body modeling tutorial on my site. Note that this is not so much a tutorial as it is a walkthrough or overview! If you are looking for a tutorial, I'd highly recommend Bill Flemings book, "3D Creature Workshop" (ISBN: 1886801789). This book covers facial modeling in detail for a variety of packages, and may be more helpful.
The front image should be put on a box for front view. The side image
on a box lines up for a right or left viewport. The reason to use shaded
boxes instead of just a backdrop image, is that you can then zoom and
pan in the front and side viewport as you work on the splines. This gives
more control over the modeling as you can zoom in and still have the background
line up to your splines as you work.
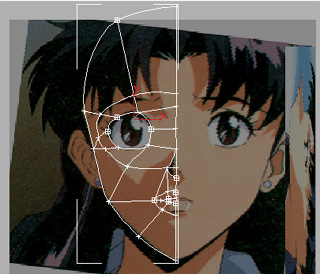
Note that the anime head shown here isn't the best contour layout, since I was trying to keep it very low detail. I ended up fixing the splines later on as you can see in some of the later images. You probably should not use this image as a perfect example of how to start laying out your splines!
The image on the right shows the anime head after being pulled into 3D.
With the anime head I had to drop following the profile too closely since
the drawing in side view didn't really match the way a 3D head would look.
Even with real photos the side view should be used as a starting reference
only. After a certain point you may become aware of perspective problems
with the photos, and generally it is better simply to tweak it by hand,
using the photos as a guide only.
At this point you can also model the back of the head and neck area.
This can be done before, or after mirroring and welding the two halves.
Just make sure you remove any extra splines at the joining edges, and
weld all the vertices together. The image at the right shows the back
of the head and neck for my anime model. I tend to draw the back of the
head out in side view, and then pull it out sideways into 3D using front
view.
For texture mapping I applied a cylindrical map around the head, and then did an unwrap texture to see the polygons. In photoshop simply paint on top of the features creating the textures. For photoreal heads, I'll utilize the scanned reference photos, cutting and pasting the major features like the ears and mouth, and distorting them to fit the unwrapped texture map. If you want to know a little more about how I did the hair, read the bottom of the body modeling tutorial on my site. I also now have a full blown hair guide under my 3d help pages as well. A basic overview is below:
Remember also that I now have a Head Poly modeling tutorial on my site now as well that you can use instead of this one.
This article, all images and character designs are Copyright 1998 Michael B. Comet All Rights Reserved. This article may be reprinted for personal use only. It may not be packaged or sold in part or in whole, either alone or as part of another package. Unauthorized duplication is strictly prohibited. This article and related artwork, samples or text, are not to be copied onto other sites without prior written consent from the author. When in doubt, ask. |

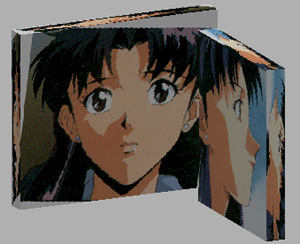 The first
thing you'll need to start with, is two reference photos of the head you
wish to model. These should be a front view, and a side/profile view. The
photos should be as close to a perfect front and side view as you can get.
After scanning them in, make 2 boxes, and apply the images to the box so
that you can see it in a shaded viewport. The snapshot on the right shows
my reference images in a User view. (These were scanned from an Evangelion
art book, but I ended up changing my design at the end.)
The first
thing you'll need to start with, is two reference photos of the head you
wish to model. These should be a front view, and a side/profile view. The
photos should be as close to a perfect front and side view as you can get.
After scanning them in, make 2 boxes, and apply the images to the box so
that you can see it in a shaded viewport. The snapshot on the right shows
my reference images in a User view. (These were scanned from an Evangelion
art book, but I ended up changing my design at the end.)
 The
next step is to start making the spline contours of your face in front
view. Simply trace the outline of half of the head and major features.
Trace the contour around the eyes, nose and mouth, as well as any detail
you want around them. Then add cross sections so that you have 3 or 4
sided patches. An easy way to do this in MAX is to turn on the "3D Snap"
button. Then in the Edit Spline 2 modifier, you can "create line" and
create the cross sections. Make sure you weld newly created points together.
The
next step is to start making the spline contours of your face in front
view. Simply trace the outline of half of the head and major features.
Trace the contour around the eyes, nose and mouth, as well as any detail
you want around them. Then add cross sections so that you have 3 or 4
sided patches. An easy way to do this in MAX is to turn on the "3D Snap"
button. Then in the Edit Spline 2 modifier, you can "create line" and
create the cross sections. Make sure you weld newly created points together.
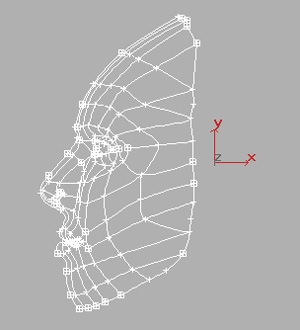
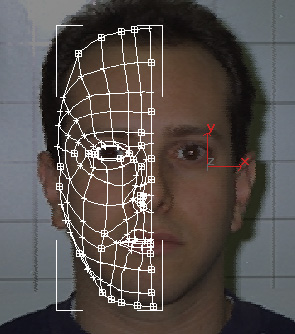 The image on the right shows my head with a more detailed contour of
splines. Actually, there are WAY too many splines here, and I ended up
deleting most of those as I worked on that head. You'll probably want
something with a level of detail in between these 2 image. (Look at the
later images in this article). But the picture of my head shows a little
better layout.
The image on the right shows my head with a more detailed contour of
splines. Actually, there are WAY too many splines here, and I ended up
deleting most of those as I worked on that head. You'll probably want
something with a level of detail in between these 2 image. (Look at the
later images in this article). But the picture of my head shows a little
better layout. 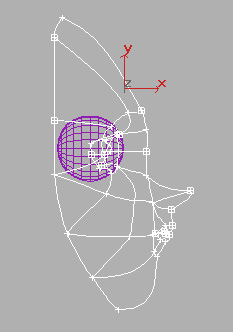 After you
are happy with the basic front view splines, the fun begins. The next step
is to pull your splines out into 3D. Using front and side views, pull put
the each control point until it matches the look of your profile reference
photo. You'll probably want to start with the splines at the middle of the
head since these will be the ones matching that image.
After you
are happy with the basic front view splines, the fun begins. The next step
is to pull your splines out into 3D. Using front and side views, pull put
the each control point until it matches the look of your profile reference
photo. You'll probably want to start with the splines at the middle of the
head since these will be the ones matching that image.
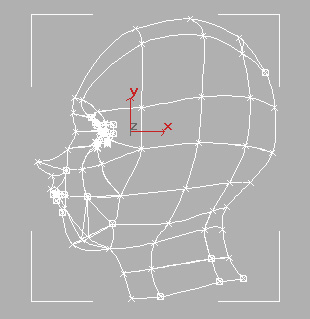
 You can also start to pay attention to folds and curves. Pulling everything
out to 3D is the most critical, and time consuming part of the modeling.
One can spend hours just tweaking where a point is and playing with the
bezier control handles. The amount of time you spend making the head look
correct here will affect how good your final image is. The image on the
right here is from my own realistic head model...still with too many splines.
You can also start to pay attention to folds and curves. Pulling everything
out to 3D is the most critical, and time consuming part of the modeling.
One can spend hours just tweaking where a point is and playing with the
bezier control handles. The amount of time you spend making the head look
correct here will affect how good your final image is. The image on the
right here is from my own realistic head model...still with too many splines.
 After
you are generally happy with the head, you should mirror it over to the
other side. This will often result in the need for more tweaking as the
model can look quite different when viewed in its full form.
After
you are generally happy with the head, you should mirror it over to the
other side. This will often result in the need for more tweaking as the
model can look quite different when viewed in its full form.
 As you work you will have an increasing number of confusing splines. This
is especially true as you get to the back and sides of the head. To help
out, it is useful to create a 3D box. Intersect this box with the head
in a shaded viewport. What will happen is the splines behind it will be
hidden. This is a nice way to see what you are doing since Edit Spline
2 doesn't have a way to hide control points or segments. Be warned however
that you can still select control points even though you can't see then.
As I tweak the front of the face, I'll usually have this "blocker" box
up so the splines in the back don't confuse me. The image on the right
shows the final spline layout I used.
As you work you will have an increasing number of confusing splines. This
is especially true as you get to the back and sides of the head. To help
out, it is useful to create a 3D box. Intersect this box with the head
in a shaded viewport. What will happen is the splines behind it will be
hidden. This is a nice way to see what you are doing since Edit Spline
2 doesn't have a way to hide control points or segments. Be warned however
that you can still select control points even though you can't see then.
As I tweak the front of the face, I'll usually have this "blocker" box
up so the splines in the back don't confuse me. The image on the right
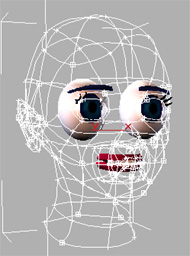
shows the final spline layout I used. 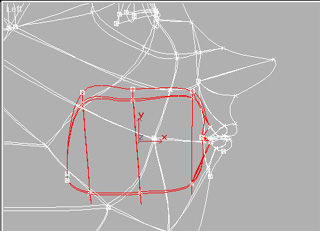 I
usually model a sack like shape that is connected to the inside of the lips
for my face models. This allows me to get a closeup of the mouth and what
appears to be the inside of the head. The tongue and teeth I usually create
as separate polygon objects. I texture this inside mouth sack with a dark
red color. This image shows the splines for the basic simple shape of the
inside of the mouth.
I
usually model a sack like shape that is connected to the inside of the lips
for my face models. This allows me to get a closeup of the mouth and what
appears to be the inside of the head. The tongue and teeth I usually create
as separate polygon objects. I texture this inside mouth sack with a dark
red color. This image shows the splines for the basic simple shape of the
inside of the mouth.  Ears can
be rather tricky to do, so I tend to model them separately. Then I merge
in the ear to the head model, welding and fixing splines as needed. There
is a pretty good discussion on ear modeling in Bill Flemings book listed
at the top of this article. The trick is in keeping only the amount of
detail you need, while still maintaining the proper shape.
Ears can
be rather tricky to do, so I tend to model them separately. Then I merge
in the ear to the head model, welding and fixing splines as needed. There
is a pretty good discussion on ear modeling in Bill Flemings book listed
at the top of this article. The trick is in keeping only the amount of
detail you need, while still maintaining the proper shape. 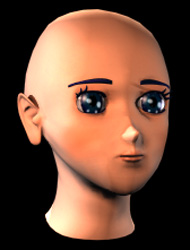
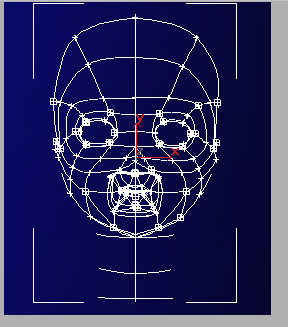
 The images to the right show the final spline model and rendering. In
this case I opted to model the eyebrows as separate poly models, but in
many cases it's just part of the texture map. I also created the gums,
teeth, tongue and eyelashes out of simple polygon objects as well.
The images to the right show the final spline model and rendering. In
this case I opted to model the eyebrows as separate poly models, but in
many cases it's just part of the texture map. I also created the gums,
teeth, tongue and eyelashes out of simple polygon objects as well.
