
 |
 |
 |
 |
 |
 |
|
|
|||||
|
Advanced Applications of the Surface Modifier |
|
||||||
STEP 1: In order to model a pair of ears as a seperate piece, we must apply the surface modifier to generate a patch surface. This is one of the main advantages SURFACE TOOLS has over NURBS at the present 3-98, it can generate a patch surface based on 3 or 4 sided polygons. If you have never applied the surface modifier without the cross section modifier, then this is a good time to learn how the surface modifier works. This is where things get a little advanced. Before we can jump into modeling an ear, we must first review how the surface modifier works. Go to Create->Spline. Pick Bezeir Corner type if you want. Draw an L shape stopping to make little verts right clicking to match the image below. 
Now, start a new line right clicking to make a small vert like normal line drawing. 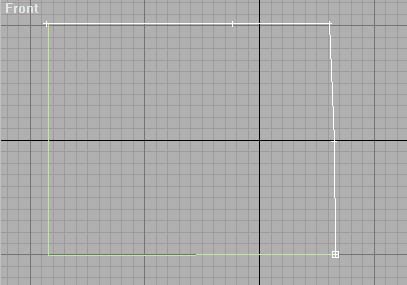
This where the pain begins. You have to solve where to draw your lines to form valid 3 or 4 sided polygons. Bottom line, the number of vertices determine whether or not your shape gets patched. With the line highlighted, go to Modify->Edit Spline->Attach the other line. Go to Sub-Object->Vertex. Observe where all your vertices sit and begin drawing lines to connect all the vertices. 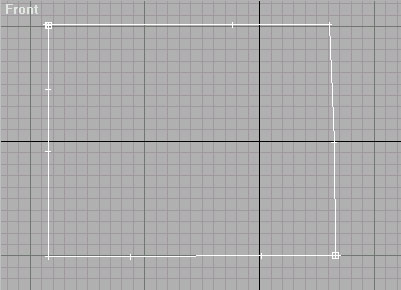
I pulled in the lines I drew so you can see the arrangement of vertices. Keeping in mind we can always Insert vertices wherever they are needed, I prepare to adjust my inner splines to form 3 or 4 sided polys. This part is very important so all of the small verts are highlighted red. 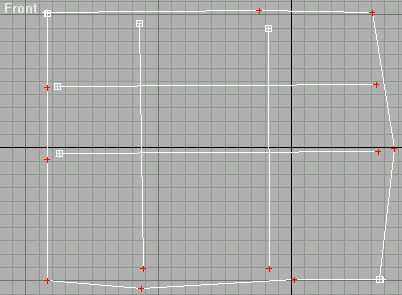
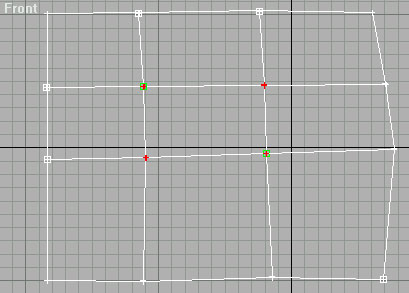
When you finish apply the surface modifier. Hopefully, the entire surface will be fully patched with the default threshold settings. Sometimes it's okay to set the threshold from 1 - 5. Anything over 5 probuly means your surface will not be too accurate. When you finish you get a plain, ordinary patch surface not worth the 3 KB to store or for any other reason, to show. But, if it's your first time successfully creating a patch surface, then rejoice! It is not easy getting the hang of the surface modifier. Well, let's get back to modeling an ear. What we're going to do is model an ear by laying out the splines in 2D space and then pull them out to give it depth. Therefore, this method is probuly one of the most difficult ways to do this. It takes considerable artistic and modeling skills. Patching a Simple Ear ShapeOnce you get the hang of the surface modifier, you can quickly erect any shape you want by laying out your splines in 2D and then pulling out the depth which is the author's, Peter Watje, prefered method to modeling organic shapes with Surface Tools. There are already tutorials on doing faces using this method, so we will concentrate on something pretty easy, an ear. Using the above method I drew the outline of my ear: the inner and outer splines. Next, I connected the vertices and welded on my big verts but that is unecessary. I do this though to make sure I get a good patch. I purposely left part of the closed spline open by leaving free vertives. Thus, the surface modifier will automatically ignore that unwanted section. Next, I drew a spline down the middle of my shape. This spline I like to refer to as a depth spline because it will be used to pull out my 3D shape. So put verts at each intersection, There will be at least two. Okay, if you have problems look at the example above to make sure you understand. Anyways, to get my 3D depth, I pulled out the depth spline by making square selections. The reason why is because your depth spline is composed of two or more vertices. So make sure you select both by holding the mouse over the area. Now, press the spacebar. Use your left and right views to pull out the depth. When you finish pulling out all the vertices along your depth spline, apply the surface modifier with a threshold below 5. 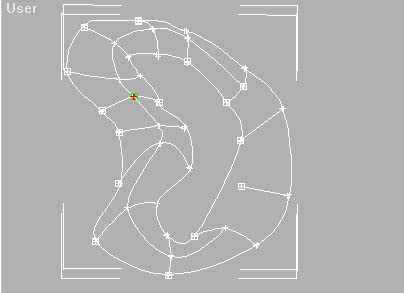

And it was that easy to build my ear component. When I finished, I adjusted the surface resolution to 2 instead of the default setting 5. I think the face count was around 300. If you want to make ear more detailed than mine, add more depth splines. Notice how each little cross section is composed of 4 sided polys. When you finish merging the files and attaching the pieces, you should have a pretty realistic 3D model and hopefully a lot less creepy looking then the one I made. If you are still having trouble with the surface modifier I recommend pulling out your surface tools documentation and look at the character called 'eddie'. Any comments/questions: |
